 In the previous post, we talked about sed command and we saw many examples of using it in text processing and we saw how it is good in this, but it has some limitations. Sometimes you need something powerful, giving you more control to process data. This is where awk command comes in. The awk command or GNU awk in specific provides a scripting language for text processing. With awk scripting language, you can make the following: a) Define variables, b) Use string and arithmetic operators, c) Use control flow and loops, d) Generate formatted reports. Actually, you can process log files that contain maybe millions of lines to output a readable report that you can benefit from.
Awk Options
The awk command is used like this:
$ awk options program file
Awk can take the following options:
-F fs To specify a file separator.
-f file To specify a file that contains awk script.
-v var=value To declare a variable.
We will see how to process files and print results using awk.
Read AWK Scripts
To define an awk script, use braces surrounded by single quotation marks like this:
$ awk '{print "Welcome to awk command tutorial "}'

If you type anything, it returns the same welcome string we provide.
To terminate the program, press The Ctrl+D. Looks tricky, don’t panic, the best is yet to come.
Using Variables
With awk, you can process text files. Awk assigns some variables for each data field found:
- $0 for the whole line.
- $1 for the first field.
- $2 for the second field.
- $n for the nth field.
The whitespace character like space or tab is the default separator between fields in awk.
Check this example and see how awk processes it:
$ awk '{print $1}' myfile

The above example prints the first word of each line.
Sometimes the separator in some files is not space nor tab but something else. You can specify it using –F option:
$ awk -F: '{print $1}' /etc/passwd
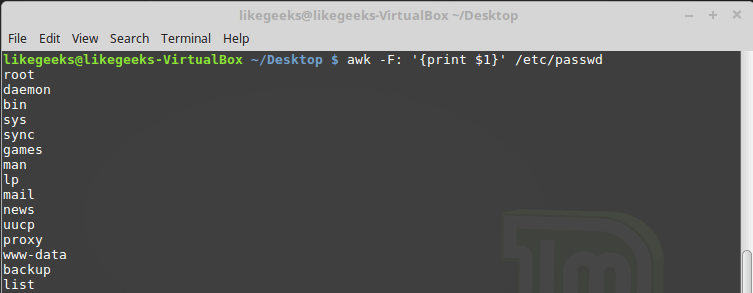
This command prints the first field in the passwd file. We use the colon as a separator because the passwd file uses it.
Using Multiple Commands
To run multiple commands, separate them with a semicolon like this:
$ echo "Hello Tom" | awk '{$2="Adam"; print $0}'

The first command makes the $2 field equals Adam. The second command prints the entire line.
Reading The Script From a File
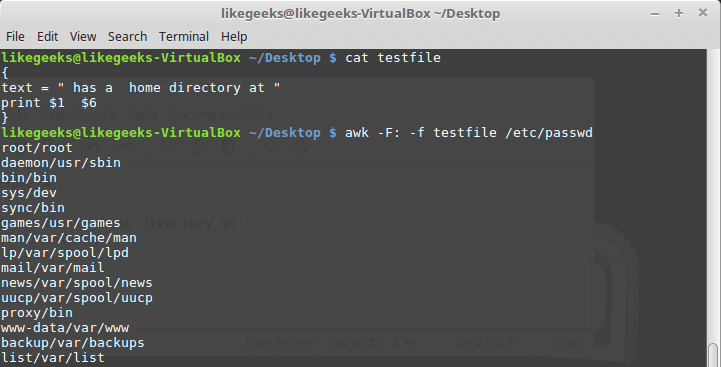
You can type your awk script in a file and specify that file using the -f option.
Our file contains this script:
{print $1 " home at " $6}
$ awk -F: -f testfile /etc/passwd
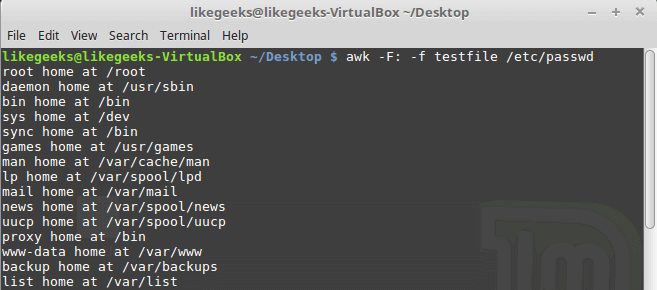
Here we print the username and his home path from /etc/passwd, and surely the separator is specified with capital -F which is the colon.
You can your awk script file like this:
{
text = " home at "
print $1 $6
}
$ awk -F: -f testfile /etc/passwd
Awk Preprocessing
If you need to create a title or a header for your result or so. You can use the BEGIN keyword to achieve this. It runs before processing the data:
$ awk 'BEGIN {print "Report Title"}'
Let’s apply it to something we can see the result:
$ awk 'BEGIN {print "The File Contents:"}
{print $0}' myfile

Awk Postprocessing
To run a script after processing the data, use the END keyword:
$ awk 'BEGIN {print "The File Contents:"}
{print $0}
END {print "File footer"}' myfile
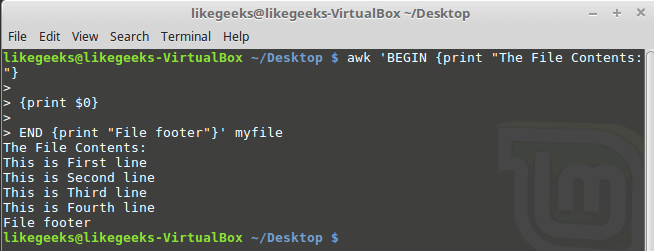
This is useful, you can use it to add a footer for example.
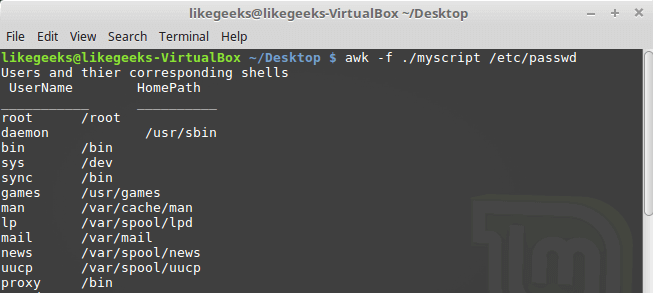
Let’s combine them together in a script file:
BEGIN {
print "Users and thier corresponding home"
print " UserName \t HomePath"
print "___________ \t __________"
FS=":"
}
{
print $1 " \t " $6
}
END {
print "The end"
}
First, the top section is created using BEGIN keyword. Then we define the FS and print the footer at the end.
$ awk -f myscript /etc/passwd
Built-in Variables
We saw the data field variables $1, $2 $3, etc are used to extract data fields, we also deal with the field separator FS.
But these are not the only variables, there are more built-in variables.
The following list shows some of the built-in variables:
FIELDWIDTHS Specifies the field width.
RS Specifies the record separator.
FS Specifies the field separator.
OFS Specifies the Output separator.
ORS Specifies the Output separator.
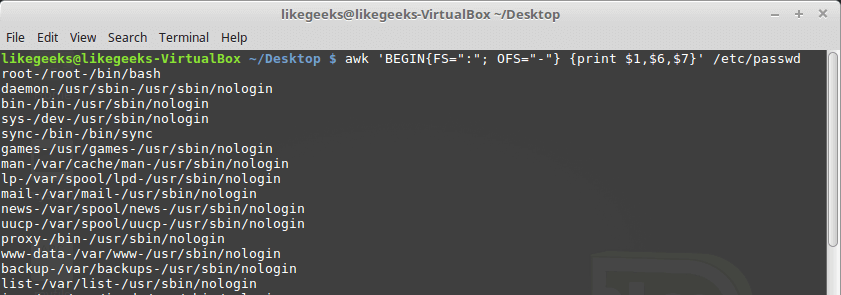
By default, the OFS variable is the space, you can set the OFS variable to specify the separator you need:
$ awk 'BEGIN{FS=":"; OFS="-"} {print $1,$6,$7}' /etc/passwd
Sometimes, the fields are distributed without a fixed separator. In these cases, FIELDWIDTHS variable solves the problem.
Suppose we have this content:
1235.96521
927-8.3652
36257.8157
$ awk 'BEGIN{FIELDWIDTHS="3 4 3"}{print $1,$2,$3}' testfile

Look at the output. The output fields are 3 per line and each field length is based on what we assigned by FIELDWIDTH exactly.
Suppose that your data are distributed on different lines like the following:
Person Name
123 High Street
(222) 466-1234
Another person
487 High Street
(523) 643-8754
In the above example, awk fails to process fields properly because the fields are separated by new lines and not spaces.
You need to set the FS to the newline (\n) and the RS to a blank text, so empty lines will be considered separators.
$ awk 'BEGIN{FS="\n"; RS=""} {print $1,$3}' addresses

Awesome! we can read the records and fields properly.
More Variables
There are some other variables that help you to get more information:
ARGC Retrieves the number of passed parameters.
ARGV Retrieves the command line parameters.
ENVIRON Array of the shell environment variables and corresponding values.
FILENAME The file name that is processed by awk.
NF Fields count of the line being processed.
NR Retrieves total count of processed records.
FNR The record which is processed.
IGNORECASE To ignore the character case.
You can review the previous post shell scripting to know more about these variables.
Let’s test them.
$ awk 'BEGIN{print ARGC,ARGV[1]}' myfile

The ENVIRON variable retrieves the shell environment variables like this:
$ awk '
BEGIN{
print ENVIRON["PATH"]
}'

You can use bash variables without ENVIRON variables like this:
$ echo | awk -v home=$HOME '{print "My home is " home}'

The NF variable specifies the last field in the record without knowing its position:
$ awk 'BEGIN{FS=":"; OFS=":"} {print $1,$NF}' /etc/passwd
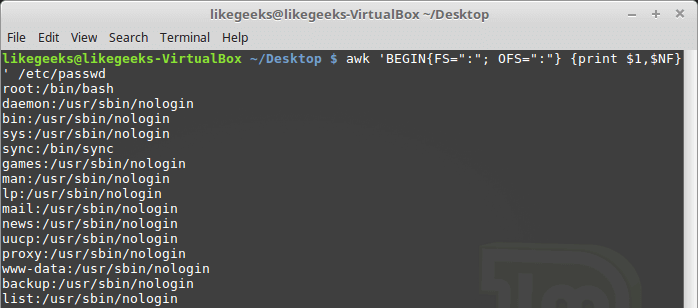
The NF variable can be used as a data field variable if you type it like this: $NF.
Let’s take a look at these two examples to know the difference between FNR and NR variables:
$ awk 'BEGIN{FS=","}{print $1,"FNR="FNR}' myfile myfile

In this example, the awk command defines two input files. The same file, but processed twice. The output is the first field value and the FNR variable.
Now, check the NR variable and see the difference:
$ awk '
BEGIN {FS=","}
{print $1,"FNR="FNR,"NR="NR}
END{print "Total",NR,"processed lines"}' myfile myfile
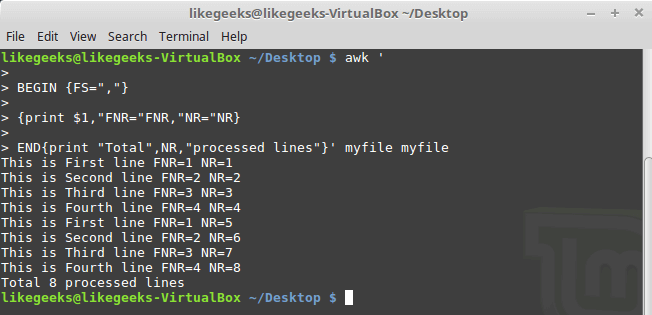
The FNR variable becomes 1 when comes to the second file, but the NR variable keeps its value.
User Defined Variables
Variable names could be anything, but it can’t begin with a number.
You can assign a variable as in shell scripting like this:
$ awk '
BEGIN{
test="Welcome to LikeGeeks website"
print test
}'

Structured Commands
The awk scripting language supports if conditional statement.
The testfile contains the following:
10
15
6
33
45
$ awk '{if ($1 > 30) print $1}' testfile

Just that simple.
You should use braces if you want to run multiple statements:
$ awk '{
if ($1 > 30)
{
x = $1 * 3
print x
}
}' testfile
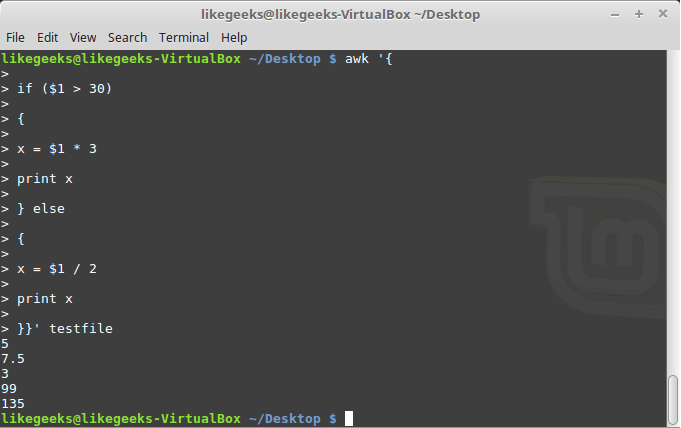
Or type them on the same line and separate the if statement with a semicolon like this:

While Loop
You can use the while loop to iterate over data with a condition.
cat myfile
124 127 130
112 142 135
175 158 245
118 231 147
$ awk '{
sum = 0
i = 1
while (i < 5)
{
sum += $i
i++
}
average = sum / 4
print "Average:",average
}' testfile
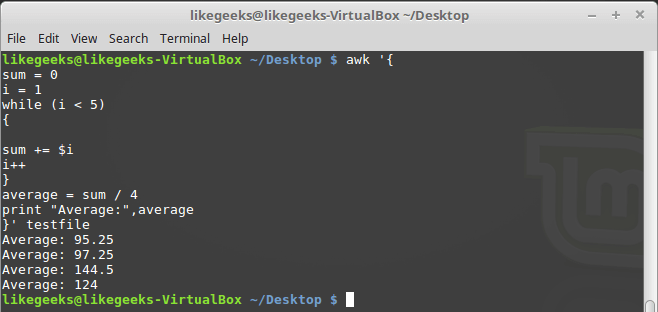
The while loop runs and every time it adds 1 to the sum variable until the i variables becomes 4.
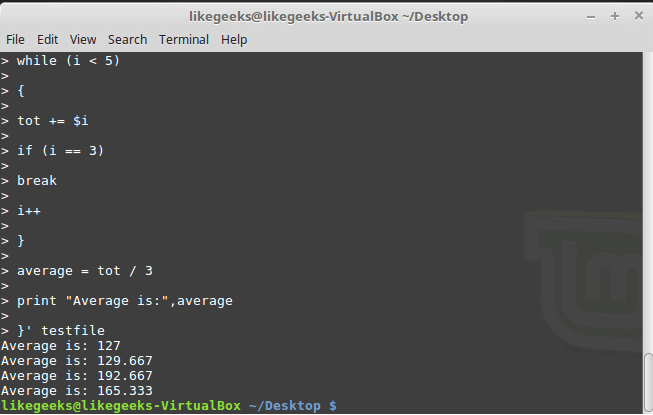
You can exit the loop using break command like this:
$ awk '{
tot = 0
i = 1
while (i < 5)
{
tot += $i
if (i == 3)
break
i++
}
average = tot / 3
print "Average is:",average
}' testfile
The for Loop
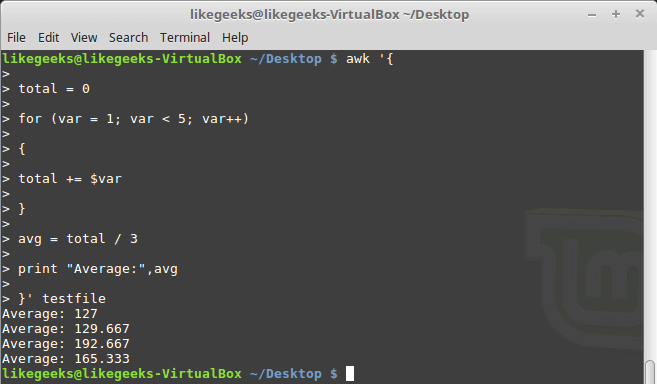
The awk scripting language supports the for loops:
$ awk '{
total = 0
for (var = 1; var < 5; var++)
{
total += $var
}
avg = total / 3
print "Average:",avg
}' testfile
Formatted Printing
The printf command in awk allows you to print formatted output using format specifiers.
The format specifiers are written like this:
%[modifier]control-letter
This list shows the format specifiers you can use with printf:
c Prints numeric output as a string.
d Prints an integer value.
e Prints scientific numbers.
f Prints float values.
o Prints an octal value.
s Prints a text string.
Here we use printf to format our output:
$ awk 'BEGIN{
x = 100 * 100
printf "The result is: %e\n", x
}'

Here is an example of printing scientific numbers.
We are not going to try every format specifier. You know the concept.
Built-In Functions
Awk provides several built-in functions like:
Mathematical Functions
If you love math, you can use these functions in your awk scripts:
sin(x) | cos(x) | sqrt(x) | exp(x) | log(x) | rand()
And they can be used normally:
$ awk 'BEGIN{x=exp(5); print x}'

String Functions
There are many string functions, you can check the list, but we will examine one of them as an example and the rest is the same:
$ awk 'BEGIN{x = "likegeeks"; print toupper(x)}'

The function toupper converts character case to upper case for the passed string.
User Defined Functions
You can define your function and use them like this:
$ awk '
function myfunc()
{
printf "The user %s has home path at %s\n", $1,$6
}
BEGIN{FS=":"}
{
myfunc()
}' /etc/passwd
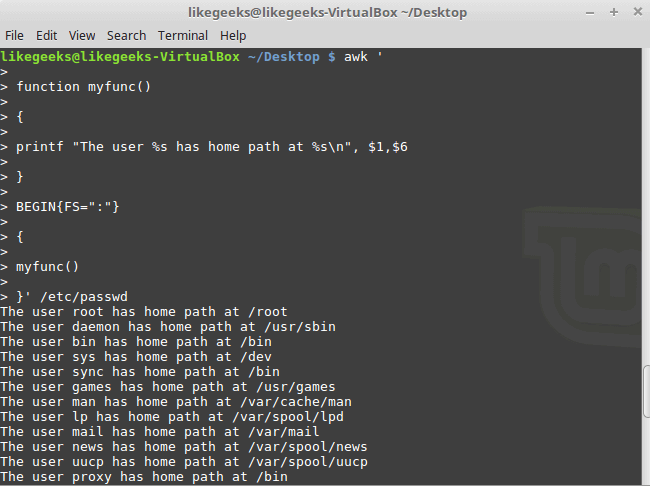
Here we define a function called myprint, then we use it in our script to print output using printf function.
I hope you like the post.
Thank you.


 In the last post, we talked about


