Tag Archives | IP address

Install, Configure, and Troubleshoot Linux Web Server

In this post, we will talk about Linux web server and how to install it and configure it to serve you content to others. A web server is a system that manipulates requests via HTTP protocol, you request a file from the server and it responds with the requested file, which might give you an idea that web servers are only used for the web. Actually, web servers can also be found embedded in devices such as printers, routers, when you open your router configuration page, there is a web server behind it. When you open the printer configuration page, there is also a web server behind it serving your requests, so web servers are important today because they are used everywhere. First, your browser sends a request to the server. The server takes the requested file or page from you and maps it to the corresponding file from the server. The server sends the file back to the browser with some information such as its MIME type, the length of the content and some other useful information.

Continue Reading →

Sometimes the requested file is a static page like HTML pages or dynamic pages like PHP, Java, Perl or any other server side language. For example, when you type www.yourDomain.com, the browser queries the DNS server about the IP address of the computer: www.yourDomain.com. Once the browser gets the response from the DNS, it starts a TCP connection on port 80 and asks for the default web page, then this page is sent to you and that’s all.

Linux Webserver Implementations

There are many Linux web server implementations available for you to use:

  • Apache server
  • Nginx
  • Lighttpd
  • Apache Tomcat
  • Monkey HTTP Daemon (used especially for embedded systems)

There are more Linux web servers, but this list is the most used web servers.

The most used web servers are Apache and Nginx.

In this post, we will use Apache server for several reasons:

  • It is stable.
  • It is flexible.
  • It is secure.

We’ll install and configure Apache server on Linux, but at first, let’s review some of the basics of HTTP protocol basics.

Understanding HTTP

When you request a file or a page from a web server, the client at first connects to the server on port 80. After successful connection, the client then sends HTTP commands (also methods) to the server. This command includes a request header which includes information about the client.

To view these request headers in chrome, open chrome devtools, then open network panel and visit google.com and check the request headers, you should see something like this:

Linux Web Server Request Header

The request header also includes information about the client, like the user agent and the accepted formats.

Additional information may be sent with the request header. For example, if you click on a link that will open another website, the header will include the referral site.

After receiving the request header completely, the server responds with the requested file or page along with a response header.

The response header includes information about the received content, its type, and other information.

Linux Web Server response header

You can check the response headers from the browser network panel.

Install Apache Webserver

You can install Apache server on Red Hat based distros using the following command:

$ dnf -y httpd

Or if you are using a Debian-based distro, you can install it like this:

$ apt-get -y install apache2

The Apache web server service is called httpd on Red Hat based distros like CentOS, while it is called apache2 in Debian based distros.

If you are using a firewall like iptables, you should add a rule for port 80.

$ iptables -I INPUT 1 -m state --state NEW -m tcp -p tcp --dport 80 -j ACCEPT

Or if you are using firewalld, you can use the following command:

$ firewall-cmd --add-port=80/tcp

To start your service and enable it on boot:

$ systemctl start httpd

$ systemctl enable httpd

You can check if your service is running or not, using the following command:

$ systemctl status httpd

You can check if your service is running or not, using the following command:

$ systemctl status httpd

Now open your browser and visit http://localhost or http://[::1]/ if you are using IP v6 and if your installation goes well, you should see your HTML homepage.

Configuring Apache Webserver

You can add files to Apache in the /var/www/html directory for top-level pages.

Just remember to make sure that any files or directories placed in that directory are world-readable.

The default index page is index.html.

The Apache configuration files are in  /etc/httpd/conf/ directory.

On Debian based systems like Ubuntu, you may find it at  /etc/apache2/apache2.conf file.

We can’t discuss every option for Apache on a single post, but we will discuss the most important options.

You call them options or directives.

ServerRoot Option

This option specifies the configuration folder for Apache web server. On Red Hat based distros, the ServerRoot option is /etc/httpd/ directory. On Debian distros the ServerRoot option is /etc/apache2/.

ServerRoot /etc/httpd

Listen Option

This is the port that Apache web server will use to wait for incoming connections.

The default value for this option is 80 for nonsecure connections and 443 for secured connections.

If you have multiple IP addresses on your server, you can assign which IP should listen for connection using Listen option.

You can specify a different port other than 80, just make sure that it’s not in use.

You can run many HTTP servers on the same hardware every one on a unique port.

When a server runs on a non-standard port such as port 8080, it will require the port number to be explicitly stated like this:

www.example.com:8080

Listen 80

ServerName Option

This option specifies the hostname of the web server that appears to the visitors.

ServerName FQDN

DocumentRoot Option

This defines the path that will contain your files that will be served.

The default path is /var/www/html .

DocumentRoot /var/www/html

MaxRequestWorkers Option

This option sets the maximum number of concurrent connections that the server will receive.

LoadModule Option

This option is used to load modules into Apache web server.

There are a lot of Apache modules like these:

mod_cgid: This module is used to run CGI scripts using Apache web server.

mod_ssl: Provides secure connections via SSL and TLS protocols.

mod_userdir: This module allows you to serve content from users specific directories.

If you want to disable loading a specific module, you can comment the Load module line that contains that module.

Or if you use Debian based distros like Ubuntu, you can use these commands:

$ a2enmod modulename

This command to enable the module.

$ a2dismod modulename

This command to disable the module.

All these commands do is create a symlink under /etc/apache2/modsenabled  directory with the file that contains the module you want to enable. All files under this directory are included in Apache configuration by default, so any file will exist in this directory will be included.

And if you use a2dismod, the symlink will be removed.

If you enable or disable a module, you have to reload or restart apache web server.

LoadModule mod_cgid.so

Include Option

This option allows you to include other configuration files.

You can store all the configuration for different virtual domains, and Apache will include them at runtime.

Include filePath

UserDir option

This option specifies the directory that will contain the files that will be accessible via the web server. This directory is usually named public_html and its location in user’s home directory.

For example, if you have a user adam who wants to make his web content available via Apache web server.

First, we make a public_html folder under his home directory.

Then set the permission for the public_html folder:

$ chmod 644 public_html

Now if we put an index.html file, it will be accessible via the browser like this:

http://YOURHOSTNAME/~adam

UserDir public_html

Alias Option

This option specifies the location of the files that are outside the DocumentRoot location and need to be served by the Apache web server.

Like you have files outside DocumentRoot and you want them to be available to the visitors.

Alias URL_Path Actual_Path

ErrorLog Option

This option specifies the error log file for Apache web server.

ErrorLog /var/log/httpd/error_log

VirtualHost Option

This option allows you to host multiple websites on the same server.

The idea is that the content is served based on the requested hostname.

To setup a virtual host for the host www.example.com. First, create a VirtualHost option in /etc/httpd/conf/httpd.conf file.

And specify the DocumentRoot and ServerName like this:

ServerAdmin [email protected]

DocumentRoot /home/adam/public_html

ServerName www.example.com

ErrorLog /var/log/users/adam/error_log

</VirtualHost>

Keep in mind that the ServerName option must be resolvable via DNS.

These are the most used Apache options.

Virtual Host Types

There are two types of virtual hosts that you can define in Apache web server:

  • Name-based virtual hosts
  • IP-based virtual hosts

The NameVirtualHost directive defines which addresses can be virtual hosts; the asterisk (*) means any name or address on this server. You can write them like this:

NameVirtualHost *
<VirtualHost *>
ServerName www.example.com
DocumentRoot “/home/user1/public_html/”
</VirtualHost>
<VirtualHost *>
ServerName www.example2.com
DocumentRoot “/ home/user2/public_html/”
</VirtualHost>

If you have more than one IP address and you want to use SSL certificate, the website must be on a dedicated IP address. You can write IP-based virtual hosts like this:

<VirtualHost 192.168.1.2>
ServerName www.example.com
DocumentRoot “/home/user1/public_html/”
</VirtualHost>
<VirtualHost 192.168.1.3>
ServerName www.example2.com
DocumentRoot “/ home/user2/public_html/”
</VirtualHost>

Apache Process Ownership

We know from the Linux process management that each process inherits its permissions of its parent process.

This fact is true for all processes except for applications with the SETUID bit set, they inherit permissions from the owner, not the parent process. A good example is the /bin/su.

If a normal user runs /bin/su program, it does not inherit the permission from adam, but it acts as a root user running it.

Since Apache web server needs to bind port 80, and this needs root privileges.

After binding to port 80, Apache can run as a normal user and read only files that have permissions to read them.

Based on the Linux distro you use, the user could be one of the following:

nobody, www, apache, www-data, or daemon.

I delayed introducing two more options for apache till reaching that point.

User Option

This specifies the user ID which the web server will use to answer requests.

User wwwdata

Group Option

This specifies the group that Apache web server will use to read files.

Group wwwdata

Security is very important for sites that use executable scripts such as CGI or PHP scripts.

The use that you will use will have permission to read and write the content of all sites on the server. But we want to ensure that only the members of a particular site can read their own site only.

This is very important because if a site got compromised, the attacker will be able to read all files since the apache user has permission to do that.

So how to solve this problem?

suEXEC Support

A popular method is to use suEXEC. suEXEC is a program that runs with root permissions and makes CGI programs run as the user and group IDs of a specific user, not the Apache server user.

You can specify the user on each virtual host like this:

<VirtualHost www.example.com>

SuExecUserGroup adam adamGroup

</VirtualHost>

Just that simple.

Apache Authentication

You may want to restrict some parts to specific visitors. It’s like a password protected directory.

In Apache, you can store authentication information file called .htpasswd file.

You can use the htpasswd command to do that.

First, create the .htpasswd file using the htpasswd command:

$ htpasswd -c /home/adam/.htpassswd myuser

The -c option is needed the first time you run htpasswd, but when you need to add more users you shouldn’t use -c because it will overwrite the file.

Then create a .htaccess file in the public_html folder and write the following:

<Location /vip>

AuthName "test"

AuthType Basic

AuthUserFile /home/adam/.htpasswd

Order deny,allow

require valid-user

</Location>

AuthName is required, you can use any string you want.

AuthType Basic says that you’re using htpasswd style user file.

AuthUserFile points to the file that contains the generated password from htpasswd command.

The Order line indicates that Apache must deny access by default, and only allow access for users specified in the htpasswd file.

The require directive means any user in the .htpasswd file is allowed.

Troubleshooting Apache Webserver

If you modify the httpd.conf file and restart or reload Apache web server and it did not work, then you have typed a wrong configuration, however, this is not the only case that you need to troubleshoot Apache, you may look at the apache logs to see how the service works so you can diagnose the problem and solve it.

The two main log files for apache are error_log and access_log files.

You can find these files in /var/log/httpd/  directory in Red Hat based distros, or in /var/log/apache2/  directory if you are using Debian based distros.

The access_log file contains every request to Apache web server with the details about client requested that resource.

The error_log file contains errors of Apache web server.

You can use tail command to watch the log file:

$ tail -f /var/log/httpd/error_log

I recommend you to review the Linux syslog server to know more about logging.

I hope you find working with Linux web server easy and interesting. Keep coming back.

Thank you.

likegeeks.com

0

Install, Configure, and Maintain Linux DNS Server

The DNS (Domain Name System) is a naming system for computers, the service that does that is called DNS server which translates an IP address to human readable address. This process is the backbone of the internet and a very important service in your server, so from that point, we will discuss DNS server or specifically Linux DNS server and how to install, configure and maintain it. Without the need to a DNS server, every system will have to keep its own copy of the table of the host names and their IP addresses. On Linux systems, this table is the /etc/hosts file. So even if you don’t have a DNS server or DNS server is unavailable, this file can translate IP addresses to names using /etc/hosts file. That means the system query this file first before going to DNS server and if it finds the domain, it will translate it without going to any DNS servers.

Continue Reading →

Try to edit /etc/hosts and type the following:

127.0.0.1 google.com

Then go to your browser and type google.com and see the results. If you have Apache server installed on your system and your localhost is running, it will show the index page of the localhost instead of google page.

Linux DNS Server

You can translate google.com to any other IP address of any site and see the result to ensure that.

So what this file is doing is translating IP addresses to names, but this for the same connected network, so what about the outside networks and how to maintain all those records for all systems?

Will everybody manage his own /etc/hosts file and update it himself? Of course not.

Domain Names

When you visit a website, you type the FQDN (Fully Qualified Domain Name) or the domain name like this: likegeeks.com or www.google.com

Each domain consists of domain components, the dot separates these components.

The text com is the top-level domain component and google is the second-level domain component and www is the third-level domain component

Actually, when you visit any website the browser silently adds a dot at the end, but not visible to you, so the domain will be like www.google.com. Notice the dot after .com, this dot is called the root domain.

But why this root domain or the dot is added?

Because this dot is served by the root name servers. At the time of this post, there are 13 root name servers in the world, you can think of them as the brain of the internet, if they go OFF the world will be without the internet.

And why 13?

Because maybe an earthquake in one place of the world might destroy a root server so the others serve until the damaged server become online.

Those root name servers are named like this: a.root-server.net, b.root-server.net, and so on.

Top Level Domain Names (TLDs)

We saw a top level domain component such as com domains.

Top level domains (TLDs) are divided into categories based on geographical or functional aspects.

There are more than 800 top level domains on the web at the time of writing this post.

The top level domains categories are:

  • Generic top-level domain like (.org, .com, .net, .gov, .edu and so on).
  • Country-code top-level domains like (.us, .ca and so on) corresponding to the country codes for the United States and Canada respectively.
  • New branded top-level domains like (.linux, .microsoft, .companyname and so on).
  • Infrastructure top-level domains like .arpa domain.

Subdomains

When you visit a website like mail.google.com the mail here is a subdomain of google.com.

Only the name servers for mail.google.com know all the hosts existing beneath it, so google answers if there is mail subdomain or not, the root name servers have no clue about that.

Types of DNS Servers

There are three types of DNS servers:

  • Primary DNS servers: They contain the domain’s configuration files and they respond to the DNS queries.
  • Secondary DNS server: They work as a backup and load distribution. Primary servers know the existence of the secondary name servers and send updates to them.
  • Caching DNS server: All they do is caching the DNS responses so you don’t need to ask the primary or secondary DNS server again. You can make your system work as a caching server easily as we will see later on this post.

Setting up Linux DNS Server

There are many packages on Linux that implement DNS functionality, but we will focus on BIND DNS server. It is used on most DNS servers worldwide.

If you are using Red Hat based distro like CentOS, you can install it like this:

$ dnf -y install bind

Or on Debian based systems like Ubuntu:

$ apt-get install bind9

Once the installation completed, you can start it and enable it to run at boot time.

$ systemctl start named

$ systemctl enable named

Configuring BIND

The service configuration is /etc/named.conf file.

There are some statements that BIND uses in that file like:

options                 used for global BIND configuration.

logging                 what can be logged and what can be ignored. I recommend you to review Linux syslog server.

zone                      define DNS zone.

include                 to include another file in named.conf.

From the options statement, you can see that the working directory for BIND is /var/named directory.

The zone statement enables you to define a DNS zone.

Like the domain google.com which has also subdomains like mail.google.com and analytics.google.com and other subdomains.

Every one of these three (the domain and subdomains) has a zone defined by the zone statement.


Defining a Primary Zone

We know from the DNS server types that there are primary, secondary and cache DNS servers.

Primary and secondary are considered equally authoritative in their answers, unlike caching server.

To define a primary zone in /etc/named.conf  file you can use the following syntax:

zone "likegeeks.com" {

type master;

file likegeeks.com.db

};

The file that contains the zone information is located in /var/named directory since this is the working directory as we know from the options.

Note that the server software or the hosting panel you’re using creates this file with this name automatically for you, so if your domain is example.org, the file will be /var/named/example.org.db.

The type is master which means this is a primary zone.

Defining a Secondary Zone

The same as the primary zone definition with little change.

zone "likegeeks.com" {

type slave;

masters Primary Nameserver IP Address Here; ;

file likegeeks.com.db

};

On the secondary zone, the domain is the same as the primary zone and the type slave here means this is a secondary zone, and the masters option to list the IP addresses of the primary nameserver and finally, the file is the path of the primary’s zone files.

Defining a Caching Zone

It is necessary but not required to have a caching zone, so you decrease the queries on the DNS server.

To define a caching zone, you need to define three zone sections the first one:

zone "." IN {

type hint;

file "root.hint";

};

The first line contains a dot which is the root name servers. The type hint; which means a caching zone entry, and the file “root.hints”; specifies the file that contains the root servers ( the 13 root name server). You can get the latest root name server from http://www.internic.net/zones/named.root

The second zone defined in the /etc/named.rfc1912.zones file and included in /etc/named.conf via include directive which is already included by default.

zone "localhost" IN {

type master;

file "localhost.db";

};

The third zone defines the reverse lookup for the localhost.

zone "0.0.127.in-addr.arpa" IN {

type master;

file "127.0.0.rev";

};

Putting these three zones on /etc/named.conf will make your system work as a caching DNS server. Now you should type the content of the files referenced like likegeeks.com.db, localhost.db, and 127.0.0.rev

These files contain the DNS record types for each zone with some options. So what are those DNS record types and how they are written?

DNS Records Types

The database files consist of record types like SOA, NS, A, PTR, MX, CNAME and TXT.

So let’s start with each record type and see how it is written.

SOA: Start of Authority Record

The SOA record describes the site’s DNS entries with the following format:

example.com. 86400 IN SOA ns1.example.com. mail.example.com. (

2017012604 ;serial

86400 ;refresh, seconds

7200 ;retry, seconds

3600000 ;expire, seconds

86400 ;minimum, seconds

)

The first line starts with the domain example.com. and ends with a period. Which is the same as the zone definition in /etc/named.conf file.

Keep in mind that DNS configuration files are extremely picky.

The IN word means Internet record.

The SOA word means Start of Authority record.

The ns1. example.com. is the domain’s name server.

The mail.host.com. is the domain administrator email. You may notice there is no @ sign and it is replaced with the period, and there is a trailing period.

Line 2 is the serial number which is used to tell the name server about the file update time, so if you make a change to the zone data, you have to increment this number. The serial number has the format YYYYMMDDxx where xx is starting from 00.

Line 3 is the refresh rate in seconds. How often secondary DNS servers should query the primary server to check for updates.

Line 4 is the retry rate in seconds. This is the time that the secondary DNS server takes for waiting after trying to connect to the primary DNS server and cannot reach it. The specified number of retry seconds.

Line 5 is the expire directive. If the secondary server cannot connect to the primary server for an update, it should discard the value after the specified number of seconds.

Line 6 tells the caching servers can’t connect to the primary DNS server, they wait before expiring an entry, this line defines the wait time.

NS: Name Server Records

You can use the NS record to specify the name servers for a zone.

You can write NS records like this:

IN NS ns1.example.com.

IN NS ns2.example.com.

It is not required to have 2 NS records, but it is preferred to have backup name servers.

A and AAAA: Address Records

The A record maps the hostname to an IP address:

support IN A 192.168.1.5

If you have a host at support.example.com on address 192.168.1.5, you can type like the above example.

Note: the host is written without a period.

PTR: Pointer Records

The PTR record is for doing the reverse name resolution, you give an IP address and it returns the hostname.

This is the opposite of what A record does.

192.168.1.5 IN PTR support.example.com.

Here we type the full host name with the trailing period.

MX: Mail Exchange Records

The MX record tells about the mail server records.

example.com. IN MX 10 mail

The domain ends with a period, the number 10 is the importance of the mail server, if you have multiple mail servers, the lower number is the less important.

CNAME: Canonical Name Records

CNAME records are like shortcuts for host names.

Suppose you have a site that has a hostname of whatever-bignameis.example.com and since the system is a web server, an alias of www or CNAME record can be created for the host.

So you can create a CNAME record to make the name www.example.com:

whatever-bignameis IN A 192.168.1.5

www IN CNAME whatever-bignameis

The first line tells the DNS server about the location of the alias, the second line creates the alias that points to www.

TXT Records

You can put any text on TXT records like your contact information or any other information you want the people to know when they query your DNS server.

You can write TXT records like this:

example.com. IN TXT " YOUR INFO GOES HERE"

Also, you can use the RP record to put the contact information.

example.com. IN RP mail.example.com. example.com.

DNS TTL Value

In /etc/named.conf on the top there is $TTL entry.

This entry informs BIND about the time to live value for each individual record.

It takes a value in seconds like 14400 seconds (4 hours), so the DNS servers will cache your zone up to four hours then will query your DNS server again.

You can lower the value, but the default value is fair. Unless you know what you are doing.

Catching Configuration Errors

When you write your zone files, maybe you forget a period or space or any other error.

You can diagnose your Linux DNS server errors from the log. The BIND service through errors in /var/log/messages, you can use the tail command to view real-time error log using -f option.

$tail -f /var/log/messages

So when you write a zone file or modify /etc/named.config and restart your service and it shows an error, you can easily identify the error from the log.

Host Command

After you have successfully added or modified your records, you can use the host command to see if your host if resolved correctly.

If you give it a hostname, it will answer with the corresponding IP addresses.

$ host example.com

Also, you can perform reverse lookups.

$ host 192.168.1.5

You can check the host and dig command

Whois Command

The whois command is used to get the domain owner’s details.

Also, the owner’s email addresses, and contact phone numbers.

$ whois example.com

The rndc Command

The rndc tool can be used to manage the name server securely.

You can check the status of the Linux DNS server like this:

$ rndc status

Also, if you make a change to any of the zone files, you can reload the service without restart the named service.

$ rndc reload example.com

Here we reload the example.com zone file.

You can reload all zones like this:

$ rndc reload

Or maybe you add new zones or change the configuration of the service, you can reload the configuration like this:

$ rndc reconfig

Linux DNS resolver

We’ve seen how a Linux DNS server works and how to configure it. The other part is the client who is contacting the DNS server.

The client is the resolver, you can check the configuration file /etc/resolv.conf

On Debian based distros, you can check /etc/resolvconf/resolv.conf.d/ directory.

The /etc/resolv.conf file contains the local DNS servers that the system uses.

The first line is used for the default search domain, and the second line indicates the IP address of the name server.

You can use your own DNS server once your BIND service running, just type them in the resolver.conf file.

Working with Linux DNS server is pretty easy. I hope you find the post useful and easy.

Thank you.

likegeeks.com

0

Linux Network Commands Used In Network Troubleshooting

In the previous post, we talked about Linux process management. In this post, we will talk about Linux network commands and how to troubleshoot your network. Once you have confirmed that the physical network is working, the next step is to troubleshoot your network and here we come to our topic which is Linux network commands and how to use them to troubleshoot your network. We are going to cover the most used Linux network commands. The ping command is one of the most used Linux network commands in network troubleshooting. It is used to check whether or not a specific IP address can be reached. The ping command works by sending an ICMP echo request to check the network connectivity.
Continue Reading →

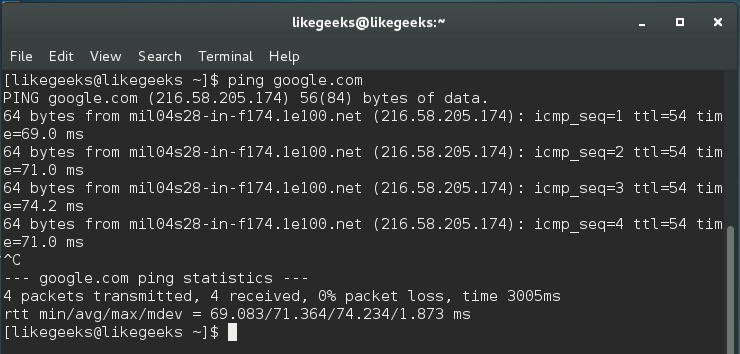
$ ping google.com

ping linux network commands

These results are showing a successful ping, and it can be described as the trip of an echo request issued by our system to google.com.

This command measures the average response. If there is no response, then maybe there is one of the following:

  • There is a physical problem on the network itself.
  • The location might be incorrect or non-functional.
  • The ping request is blocked by the target.
  • There is a problem in the routing table.

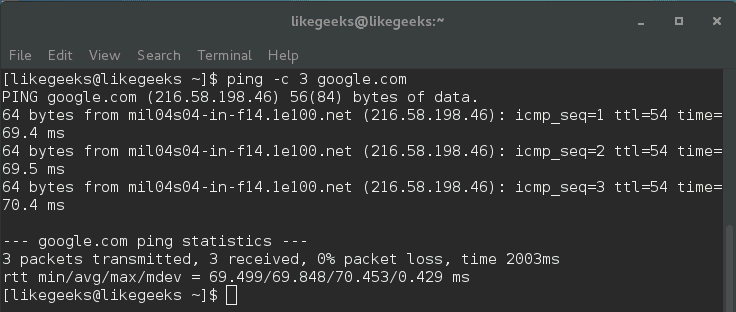
If you want to limit the number of echo requests made to 3, you can do it like this:

$ ping -c 3 google.com

ping -c Linux network commands

Here ping command stops sending echo requests after 3 cycles.

There are some issues that you should consider about ping command. These issues may not necessarily mean that there is a problem like:

Distance to the target: so if you live in the U.S. and you ping a server on Asia, you should expect that this ping will take much time than pinging a server in the U.S.

The connection speed: if your connection is slow, ping will take longer time than if you have a fast connection.

The hop count: this refers to routers and servers that the echo travels across till reaching its destination.

The important rule about ping is that the low ping is always desirable.

Get DNS Records Using dig and host Commands

You can use the dig command to verify DNS mappings, host addresses, MX records, and all other DNS records for a better understanding of DNS topography.

The dig command was developed to replace nslookup command.

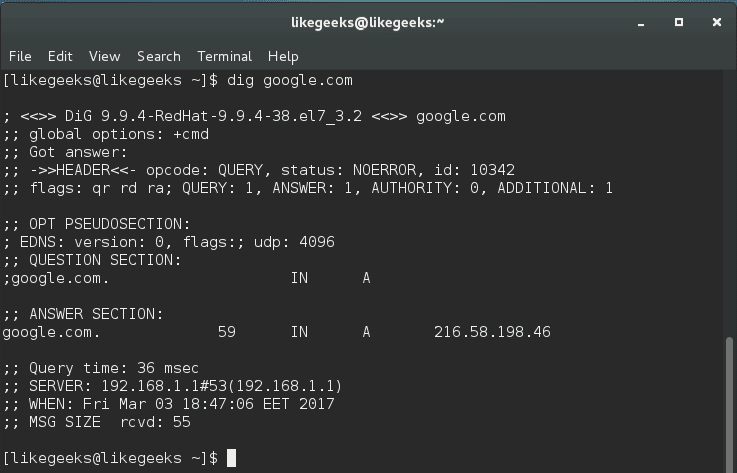
$ dig google.com

dig linux network commands

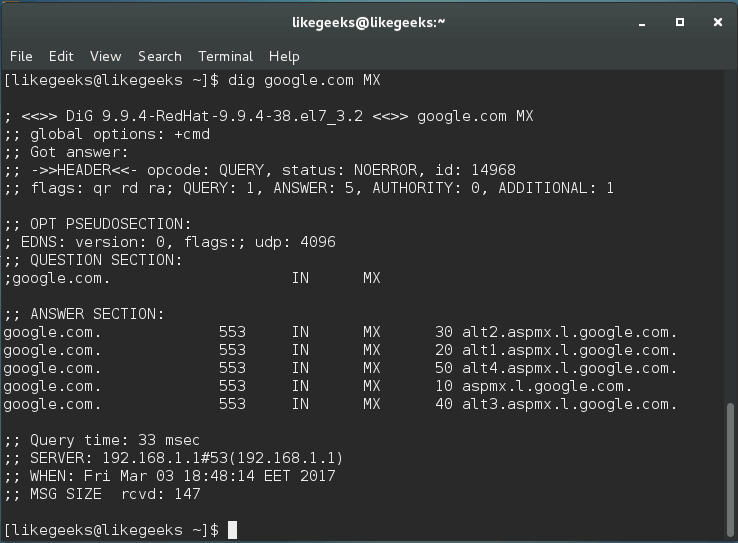
The dig command by default searches for A records, you can obtain information for specific record types like MX records or NS records.

$ dig google.com MX

dig mx linux network commands

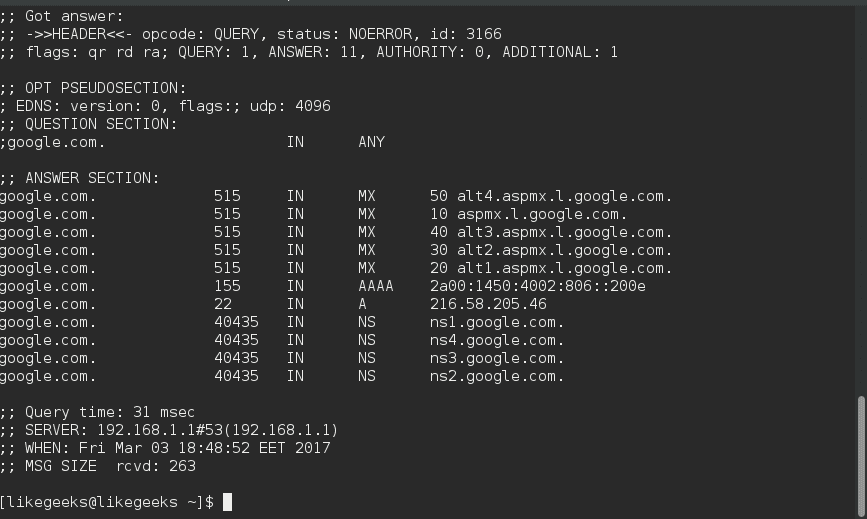
You can get all types of records by using ANY query.

$ dig google.com ANY

dig ANY linux network commands

The dig command makes a reverse lookup to get DNS information like this:

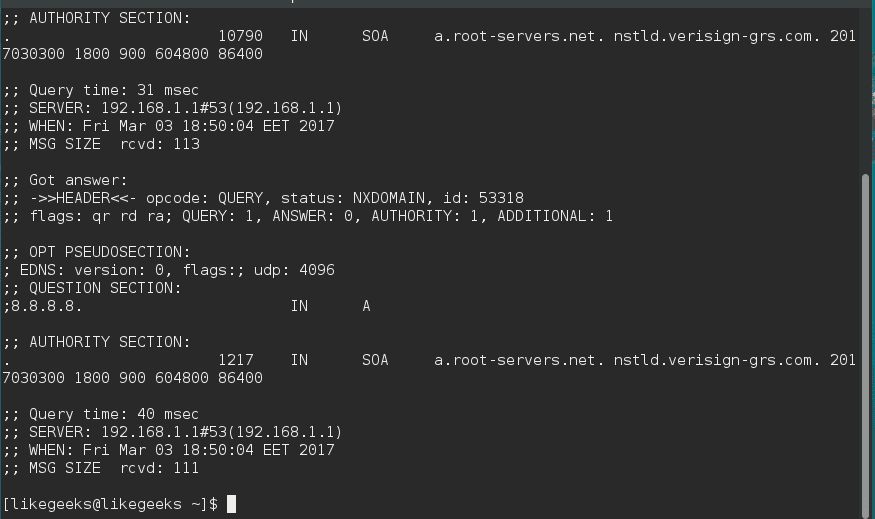
$ dig –x 8.8.8.8

dig -x linux network commands

dig command does its query using the servers listed on /etc/resolv.conf.

The host command is similar to dig command.

$ host –a google.com

host linux network commands

Also, you can perform reverse lookups using host command.

$ host 8.8.8.8

So both commands work in a similar way but dig command provides more advanced options.

Diagnose Network Latency Using traceroute Command

The traceroute command is one of the most useful Linux network commands. It is used to show the pathway to your target and where the delay comes from. This command helps basically in:

  • Providing the names and the identity of every device on the path.
  • Reporting network latency and identify at which device the latency comes from.

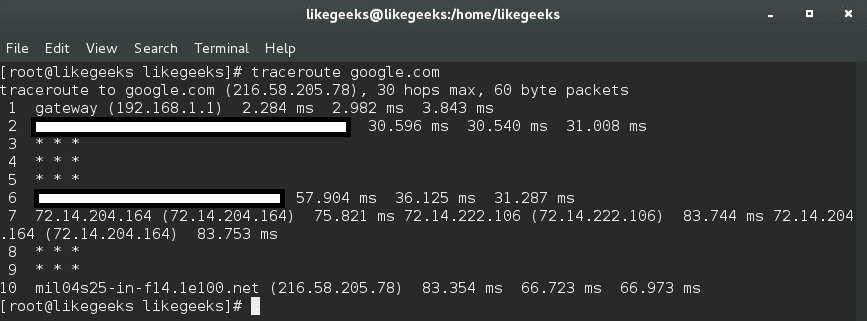
$ traceroute google.com

traceroute linux network commands

The output will provide the specified host, the size of the packet that will be used, the IP address, and the maximum number of hops required. You can see the hostname, IP address, the hop number, and packet travel times.

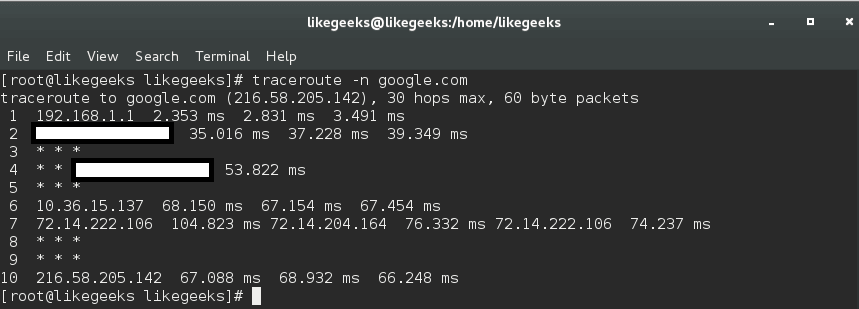
To avoid reverse DNS lookup, use the -n option.

$ traceroute -n google.com

traceroute -n linux network commands

By using traceroute command, you can identify network bottlenecks. The asterisks shown here means there is a potential problem in routing to that host, as the asterisks indicate packet loss or dropped packets.

The traceroute command sends a UDP packet, traceroute can send UDP, TCP, and ICMP.

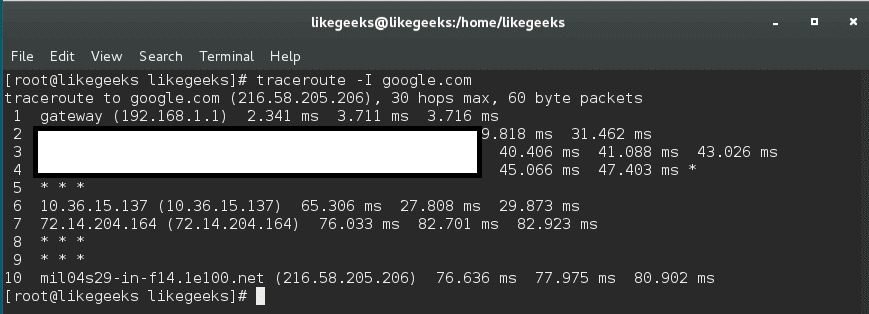
If you need to send ICMP packet, you can send it like this:

$ sudo traceroute -I google.com

traceroute -I linux network commands

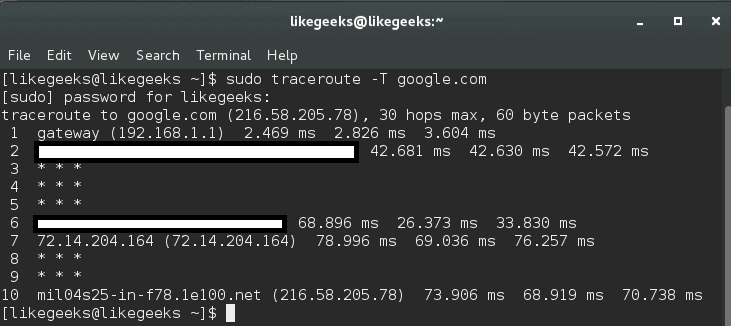
To use a TCP variation, it can be used like this:

$ sudo traceroute -T google.com

traceroute -T linux network commands

This is because some servers block UDP requests, so you can use this method.

In this case, you can send UDP, ICMP, or TCP to bypass these issues.

mtr Command (Realtime Tracing)

This command is an alternative to traceroute command.

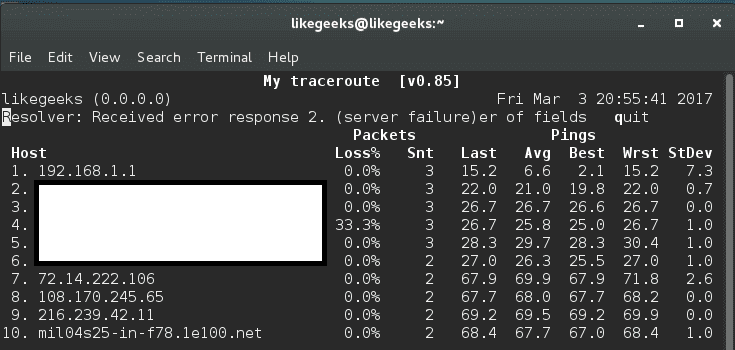
$ mtr google.com

mtr linux network command

The best thing about mtr command is that it displays real-time data unlike traceroute.

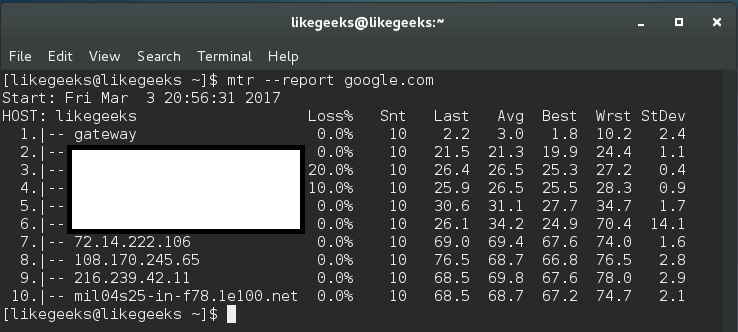
Furthermore, you can use the mtr command with –report option, this command sends 10 packets to each hop found on its way like this:

$ mtr --report google.com

mtr report linux network command

This command gives a huge amount of details better than traceroute.

If this command doesn’t run using a normal user account, you should use root, since some distros adjust the permission of this binary for root users only.

Checking Connection Performance Using ss Command

The socket statistics command ss is a replacement for netstat, it’s faster than netstat and gives more information.

The ss command gets its information directly from the kernel instead of relying on /proc directory like netstat command.

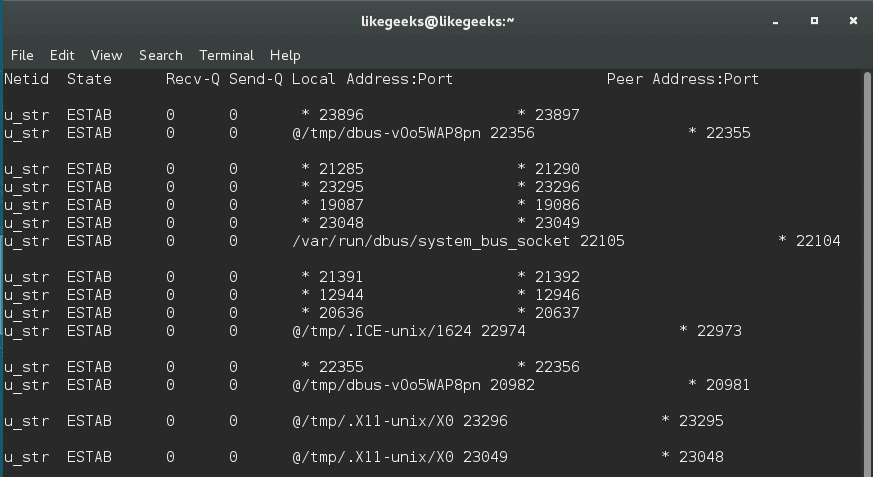
$ ss | less

ss linux network command

This command outputs all TCP, UDP, and UNIX socket connections and pipes the result to the less command for better display.

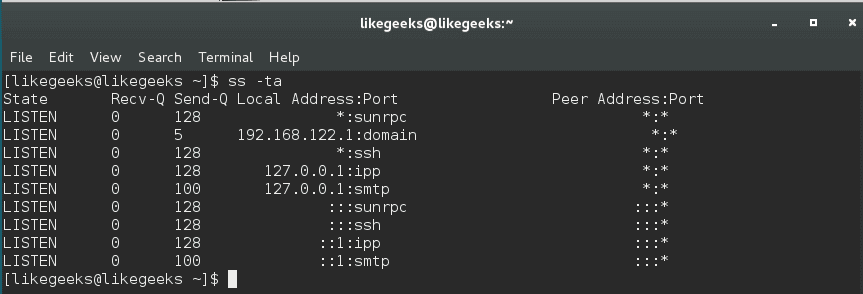
You can combine this command with either the -t to show TCP sockets or -u to show UDP or -x to show UNIX sockets. And you should use -a option combined with any of these options to show the connected and listening sockets.

$ ss -ta

ss -ta linux network command

To list all established TCP sockets for IPV4, use the following command:

$ ss -t4 state established

ss established connections

To list all closed TCP states:

$ ss -t4 state closed

You can use the ss command to show all connected ports from a specific IP:

$ ss dst XXX.XXX.XXX.XXX

And you can filter by a specific port like this:

$ ss dst XXX.XXX.XXX.XXX:22

Install and Use iftop Command For Traffic Monitoring

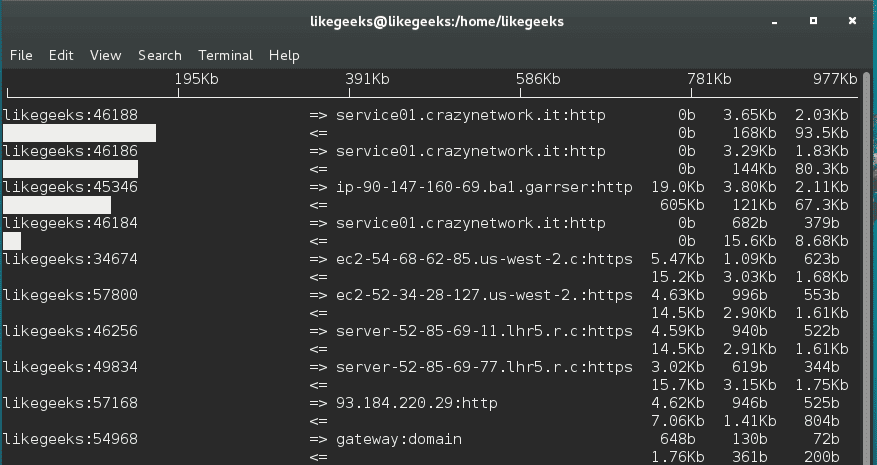
iftop utility or iftop command is used to monitor the traffic and display real-time results.

You can download the tool like this:

$ wget http://www.ex-parrot.com/pdw/iftop/download/iftop-0.17.tar.gz

Then extract it:

$ tar zxvf iftop-0.17.tar.gz

Then compile it:

$ cd iftop-0.17

$ ./configure

$ make

$ make install

If you got any errors about libpcap, you can install it like this:

$ yum install libpcap-dev

And you can run the tool as a root user like this:

$ sudo iftop -I

iftop command

And you will see this table with a real-time data about your traffic.

add P option with iftop to show ports.

$ sudo iftop -P

iftop -P linux network commands

You can use the -B option to display the output in bytes instead of bits which is shown by default.

$ iftop -B

iftop -B linux ntwork command

There a lot of options, you can check them man iftop

arp Command

Systems keep a table of IP addresses and their corresponding MAC addresses, this table is called ARP lookup table. If you try to connect to an IP address, your router will check for your MAC address. If it’s cached, ARP table is not used.

To view the arp table, use the arp command:

$ arp

arp linux network command

By default, arp command shows the hostnames, you can show IP addresses instead like this:

$ arp -n

arp -n linux network command

You can delete entries from the arp table like this:

$ arp -d HWADDR

Packet Analysis with tcpdump

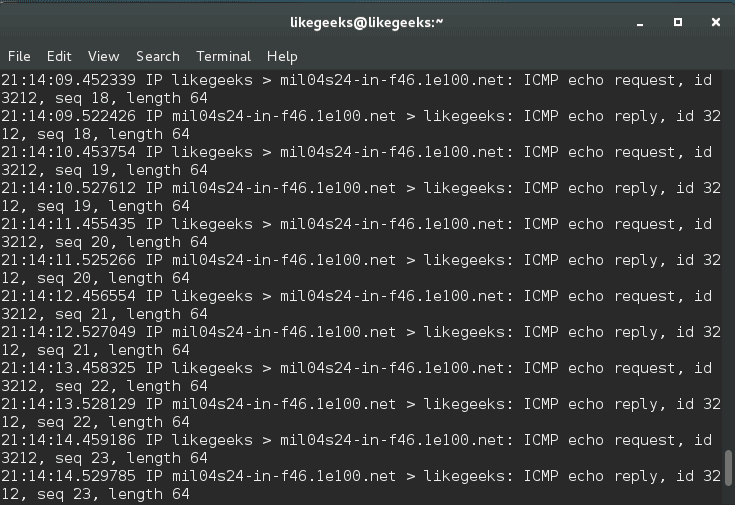
One of the most important Linux network commands is The tcpdump command. tcpdump command is used to capture the traffic that is passing through your network interface.

This kind of access to the packets which is the deepest level of the network can be vital when troubleshooting the network.

$ tcpdump -i <network_device>

tcpdump linux network command

You can also specify a protocol (TCP, UDP, ICMP and others) like this:

$ tcpdump -i tcp

Also, you can specify the port:

$ tcpdump -i port 80

tcpdump will keep running until the request is canceled; it is better to use the -c option in order to capture a pre-determined number of events like this:

$ tcpdump -c 20 -i

You can also specify the IP to capture from using src option or going to using dst option.

$ tcpdump -c 20 -i src XXX.XXX.XXX.XXX

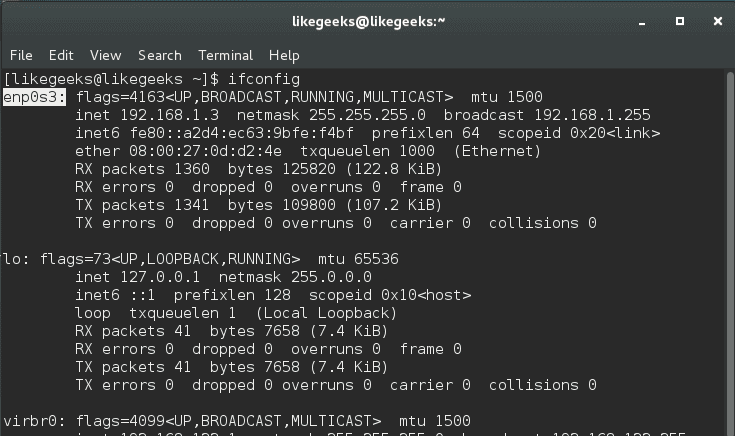
You can obtain the device names like this:

$ ifconfig

ifconfig linux network command

You can save the traffic captured from tcpdump to a file and read it later with -w option.

You can save the traffic captured from tcpdump to a file and read it later with -w option.

$ tcpdump -w /path/ -i

And to read that file:

$ tcpdump -r /path

I hope that Linux network commands we’ve discussed in this post could help you troubleshoot some of your network problems and take the right decision.

Thank you.

likegeeks.com

0