Install squid
Installing squid proxy server is very simple. For Red Hat based distro, you can install it like this:
$ dnf -y install squid
Or if you are using Debian based distro, you can install it like this:
$ apt-get -y install squid
Now you can start squid service and enable it at startup:
$ systemctl start squid
$ systemctl enable squid
To squid proxy server, you can check the configuration file in /etc/squid/squid.conf
Before we dig into the configuration, let’s see the proxy server in action.
Just change the proxy setting on your browser to the IP address of the proxy and the port 3128 since this is the squid default port. You can change the default port by changing the http_port option in the configuration file.

As shown on the image I’ve pointed my browser to my Linux proxy server and I can browse the web without any problems.
If you are using iptables firewall, don’t forget to open the squid server port.
Allow IP Address Range
If you open the configuration file /etc/squid/squid.conf, you will see the rules that allow IP addresses to connect to the proxy server like this:
acl localnet src 192.168.0.0/16
However, you can add a new ACL entry to allow a range of IP addresses to connect to your proxy server:
acl localnet src 212.80.113.0/16
Then save the file and restart squid service:
$ systemctl restart squid
Very easy, right?
Also, if you remove any ACL from the file, all IP addresses from that range will not be able to connect to the proxy server.
Allow Specific Ports
You can find all ports that are allowed in the configuration file like this:
acl Safe_ports port 80
Consider adding Safe_ports ACL rule for any port that your clients need.
You can add a port range instead of writing a rule for every port like this:
acl Safe_ports port 6000-7000
Don’t forget to restart the squid proxy server after the modification:
$ systemctl restart squid
Authenticating Users
You can force your users to authenticate before they use your Linux proxy server using Apache authentication.
First, we create a file that will store the users:
$ touch /etc/squid/passwd
Then change the ownership to squid daemon so it can access the file:
$ chown squid /etc/squid/passwd
Now we will create a new user using the htpasswd command:
$ htpasswd /etc/squid/passwd likegeeks
It will prompt you for the password twice.
If you open the created file, you will see the user and the hashed password.
Then you change the squid configuration to tell it about the authentication that it should use.
Add the following lines below the ACL ports and nowhere else to enable authentication:
auth_param basic program /usr/lib64/squid/basic_ncsa_auth /etc/squid/passwd
auth_param basic children 5
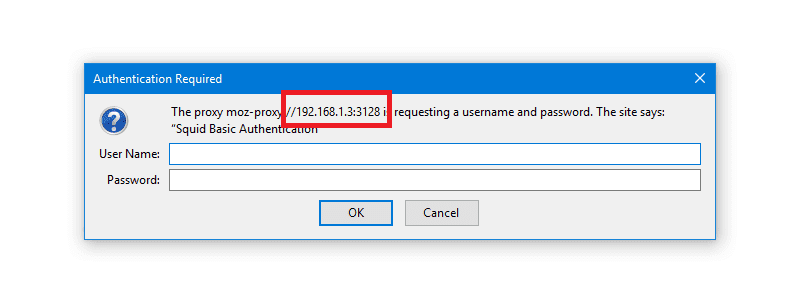
auth_param basic realm Squid Basic Authentication
auth_param basic credentialsttl 3 hours
acl auth_users proxy_auth REQUIRED
http_access allow auth_users
Then restart the squid service and try to open the browser again.
$ systemctl restart squid

As you can see, if you try to connect to the Linux proxy server, it will prompt you for the username and the password.
Block Websites
You can block websites from the proxy users, just create a separate file that will be the list of domains you want to block and point that file from the squid configuration like this:
$ touch /etc/squid/blocked
Then type all websites you want to block one per line in that file and save it.
Now change the squid configuration to block those websites under acl list and http_access list.
acl blocked_sites dstdomain "/etc/squid/blocked"
http_access deny blocked_sites
Then restart squid service:
$ systemctl restart squid
There are a lot of ready to use lists on the web and they are categorized, you can use them in squid, like MESD blacklists, Shalla’s Blacklists.
Modify Content
Since the Linux proxy server is between the browser and the internet, this is a very good position to alter the delivered content.
You can change images or ads or whatever. This can be done using the url_rewrite_program module.
Actually, you can do more than that, but we don’t want to be evil.
In our example, we will flip the images and surf the flipped images instead of the original.
First, we need to install ImageMagick:
$ dnf -y install imagemagick
Then we will write the script that will do the magic. The script will be written in Perl.
You can find the script here
This Perl script searches for JPG, GIF and PNG, images in the carried content, once it is found, it uses mogrify utility that shipped with ImageMagick to flip the images and put the flipped image in /var/www/html/ which is the root directory for Apache server and apache service should be running of course, then send the flipped images as a response.
Just make sure to add ownership for squid for this folder:
$ usermod -aG www-data squid
Finally, you have to tell squid about this script. Open the configuration file and type the following:
url_rewrite_program /home/likegeeks/flip.pl
Then restart your squid service
$ systemctl restart squid
The web has a lot of Perl scripts that play with the content, some of them are good, and some others are evil.
Anonymous Browsing
By default squid proxy server forwards the client IP address to the requested site, if you want the proxy to be surf users anonymously, you should send squid IP instead of clients IPs.
To do that, change the forwarded_for option to off in /etc/squid/squid.conf file.
forwarded_for off
And add the following options mentioned here at the end of the configuration file.
Then restart the service:
$ systemctl restart squid
You can check your public IP address, you will notice that your IP is the squid proxy server IP.
Connecting Squid Servers
The cache_peer directive sets your peer caches and informs Squid how to communicate with them.
It is written like this:
cache_peer hostname Server-type http-port icp-port [options]
The first argument is the other squid hostname or IP address.
The 2nd argument specifies the type of the other server.
The 3rd argument is the port number.
The 4th argument specifies the ICP port (Internet Caching Protocol) which is 3130. This is used to query other cache servers.
The cache_peer has some options you can use like:
proxy-only: This option prevents Squid from saving any responses it receives from the other squid server.
no-delay: If any delay, it will be ignored.
login= user:password: The authentication credentials to the other server. It takes this formula login =user:password
connect-timeout: This option specifies the connection timeout to other squid servers.
Write your options and save the configuration file and restart the service.
Squid Log Files
Log files are your main source for problem diagnostics and various squid operations.
There are cache.log, access.log, and store.log. You can find them in /var/log/squid directory.
The cache.log file contains informational messages about Squid’s operation. All proxy errors are written to this file.
The access.log file contains all HTTP request made by the clients.
The store.log file contains information about the passed objects.
Each entry on these files is written with time stamps when the message was generated.
I hope you find working with Linux proxy server is easy. Keep coming back
Thank you.
likegeeks.com

 DNF veya Dandified YUM; RPM tabanlı dağılımlar için Red Hat tarafından geliştirilmekte olan GPL 2 lisanslı yeni bir paket yöneticisi olan yazılımın 3.3.0 sürümü çıktı. Henüz resmi duyurusu yapılmamış olan yazılım, indirilmek üzere yansılarda yerini aldı. Fedora 18 ile kullanıma sunulan yeni paket yöneticisi, Mayıs 2015’te kullanıma sunulan 22 no’lu sürümünden sonra Fedora’nın varsayılan paket yöneticisi olmuştur. C ve Python ile yazılan DNF, 6 no’lu sürümünden bu yana Mageia Linux için de alternatif bir paket yöneticisi olarak sunulmaktadır. Paket yönetimini RPM, libsolv ve hawkey kütüphanelerini kullanarak yapan yazılım, üst veriyi idare etmek ve paketleri indirmek için librepo’yu, comps verilerini etkili bir şekilde idare etmek ve işlemek için libcomps’u kullanıyor.
 Beta sürümü

 Linux proxy server or proxy server generally is a server that saves the visited web pages for later requests, so if you try to visit the same web page or any one else, the page will be retrieved from the proxy server. This is very useful, it makes web surfing much faster and reduces the traffic which means less cost. Caching servers can decrease external traffic up to 45%. Another main advantage for proxy servers, you can configure the proxy with some settings for access control. For example, you can restrict access to specific websites. If you surf the web before from an anonymous proxy, this is actually a proxy server. You can choose any of the available Linux proxy servers out there like: Squid, Varnish, Polipo, TinyProxy, and more. In this post, we will discuss the most common Linux proxy server which is Squid.
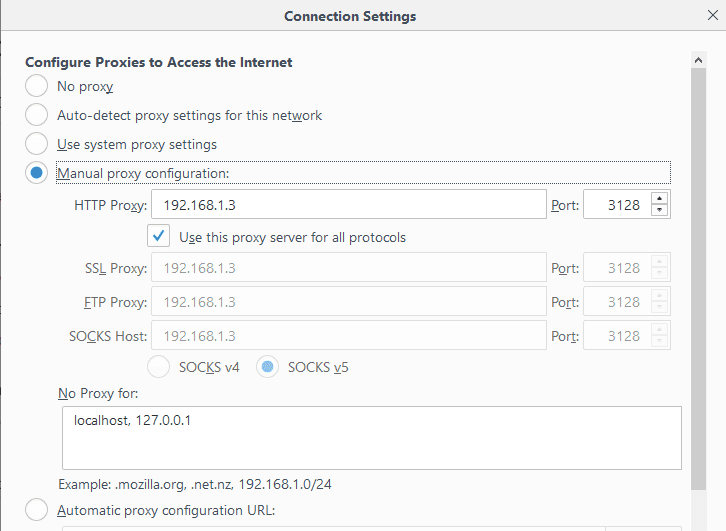
 Red Hat’tan
  Beta sürümü